SSH (Secure Shell),为远程登录会话和其他网络服务提供加密传输和使用环境。传统的网络服务都是明文传输(如Telnet,FTP),包括明文数据、明文用户名和密码,极易受到中间人攻击。SSH目前是比较可靠的通讯方式;同时,SSH压缩其传输的数据,可以加快传输速度,是目前最为常用的远程登录(代替Telnet)和文件传输(SFTP代替FTP)工具。本文介绍相关Linux下SSH服务及客户端的配置以及SSH相关命令。
之前的博客有提到过SSH的文章如下:
- 工具01:Cygwin的安装配置:Cygwin中安装SSH。
- 工具03:PuTTY常用配置:Windows的SSH工具。
- 工具04:PuTTY的小伙伴PuTTYgen和Plink:Windows下的SSH密钥生成器。
- 工具09:资源管理器替代者:Total Commander:TC的Sftp插件。
- Linux进阶07:Linux远程桌面配置:SSH隧道。
SSH的安全验证
SSH提供两种级别的安全验证。
- 第一种级别(基于密码的安全验证),知道帐号和密码,就可以登录到远程主机,并且所有传输的数据都会被加密。但是,可能会有别的服务器在冒充真正的服务器,无法避免被“中间人”攻击。
- 第二种级别(基于密钥的安全验证),需要依靠密钥,也就是你必须为自己创建一对密钥,并把公有密钥放在需要访问的服务器上。客户端软件会向服务器发出请求,请求用你的密钥进行安全验证。服务器收到请求之后,先在你在该服务器的用户根目录下寻找你的公有密钥,然后把它和你发送过来的公有密钥进行比较。如果两个密钥一致,服务器就用公有密钥加密“质询”(challenge)并把它发送给客户端软件。从而避免被“中间人”攻击。
以上内容来自维基百科。
SSH服务端公有密钥查询和比对
服务端执行如下命令,查询公有密钥(fingerprint)。默认是通过SHA256的形式展现,可以使用ssh-keygen的-E md5参数,改变公有密钥显示方式为MD5。为了避免中间人攻击,可以提前把公有密钥发送个客户端,以便进行对照。1
2
3
4
5
6
7
8
9$ for file in /etc/ssh/*sa_key.pub; do ssh-keygen -lf $file; done
1024 SHA256:7fEJPt+wnqW89TeckoMFEMuj6rLXAjgwup2cgfXRY/0 root@Arch (DSA)
256 SHA256:fbk0IHk1RAOWFFmN4TC7qgqIGTJ1lYvxRsiAjWOdzVc root@Arch (ECDSA)
2048 SHA256:QP5Ku0CIEclNQQwgTguQMOXWugyVfiVsIT7MFlPOynE root@Arch (RSA)
$ for file in /etc/ssh/*sa_key.pub; do ssh-keygen -E md5 -lf $file; done
1024 MD5:a4:93:01:1c:f2:e4:de:c3:b8:92:0e:b5:0e:12:5f:81 root@Arch (DSA)
256 MD5:1d:f8:f6:1c:6f:10:a1:fc:50:f5:87:e2:da:e9:29:84 root@Arch (ECDSA)
2048 MD5:19:53:68:4f:df:3f:56:8a:9f:5b:4e:7e:30:be:d7:63 root@Arch (RSA)
注:CentOS6.5默认使用MD5的方式进行显示,并且不支持-E参数。
PuTTY客户端首次登录服务端的公有密钥对比,采用的是MD5的方式。通讯密钥是RSA。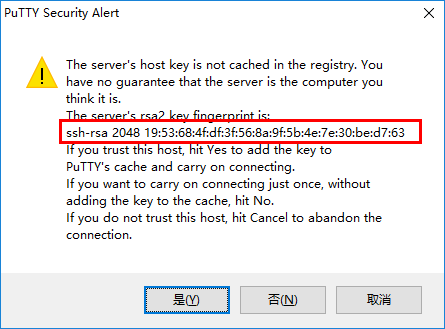
ssh命令(如Windows的Cygwin)首次登录也可以进行公有密钥对比,默认是SHA256的形式。1
2
3
4$ ssh 192.168.80.23
The authenticity of host '192.168.80.23 (192.168.80.23)' can't be established.
ECDSA key fingerprint is SHA256:fbk0IHk1RAOWFFmN4TC7qgqIGTJ1lYvxRsiAjWOdzVc.
Are you sure you want to continue connecting (yes/no)?
或者指定为MD5的形式。1
2
3
4$ ssh -o FingerprintHash=md5 192.168.80.23
The authenticity of host '192.168.80.23 (192.168.80.23)' can't be established.
ECDSA key fingerprint is MD5:1d:f8:f6:1c:6f:10:a1:fc:50:f5:87:e2:da:e9:29:84.
Are you sure you want to continue connecting (yes/no)?
在~/.ssh/known_hosts中会保存登录过的服务器的公有密钥信息,可以通过如下命令进行查询和比对。1
2
3
4
5
6
7$ ssh-keygen -F 192.168.80.23 -l
# Host 192.168.80.23 found: line 1
192.168.80.23 ECDSA SHA256:fbk0IHk1RAOWFFmN4TC7qgqIGTJ1lYvxRsiAjWOdzVc
$ ssh-keygen -F 192.168.80.23 -l -E md5
# Host 192.168.80.23 found: line 1
192.168.80.23 ECDSA MD5:1d:f8:f6:1c:6f:10:a1:fc:50:f5:87:e2:da:e9:29:84
SSH客户端常用命令
登录
可以使用如下两种方式登录。
a. 用户名@主机地址1
$ ssh learnit@192.168.80.23
b. 使用-l参数1
$ ssh 192.168.80.23 -l learnit
执行一次性命令
如果只想在服务器上,快速执行一条命令并返回结果,不需要登录、输入命令、退出等多个操作,只需要在登录时后添加命令即可。1
2
3
4
5
6
7
8$ ssh learnit@192.168.80.23 'ls -l'
total 32
drwxr-xr-x 2 learnit learnit 4096 Feb 15 2016 Desktop
drwx------ 2 learnit learnit 4096 Jan 29 11:19 Downloads
drwxr-xr-x 3 learnit learnit 4096 Jan 25 11:46 git
drwxr-xr-x 4 learnit learnit 4096 Jan 29 11:21 local
drwxr-xr-x 2 learnit learnit 4096 Jan 13 2016 python
drwxr-xr-x 5 learnit learnit 4096 Jan 27 10:03 temp
客户端生成密钥
使用ssh-keygen命令生成本地密钥,默认存放在~/.ssh/目录下。1
2
3
4
5
6
7
8
9
10
11
12
13
14
15
16
17
18
19
20
21$ ssh-keygen
Generating public/private rsa key pair.
Enter file in which to save the key (/home/Jeremy/.ssh/id_rsa):
Enter passphrase (empty for no passphrase):
Enter same passphrase again:
Your identification has been saved in /home/Jeremy/.ssh/id_rsa.
Your public key has been saved in /home/Jeremy/.ssh/id_rsa.pub.
The key fingerprint is:
SHA256:VrUMOvTHxh53W+Dm2ioPRb9Qa94nv47epD1lV2IjLLk Jeremy@Jeremy-Dell
The key's randomart image is:
+---[RSA 2048]----+
| . . . . |
| . o * o . |
| o ooX = o|
| oo=oB+o+|
| S o+o=+.|
| . E. * o+|
| . . =o=|
| .. .*+.|
| o++.=+|
+----[SHA256]-----+
常用参数:-t:密钥类型,dsa,ecdsa,ed25519,rsa,rsa1,默认rsa。-C:对密钥的注释。-f:密钥存放位置,推荐使用绝对路径。1
$ ssh-keygen -t rsa -C 'second ssh key' -f ~/.ssh/id_rsa_second
此命令表示生产一个叫second ssh key的rsa密钥,存放位置是~/.ssh/id_rsa_second。
发送密钥到服务端
有两种方式发送密钥。发送成功后,即可免密码登录。
a. 使用ssh-copy-id命令1
2
3
4
5
6
7
8
9
10$ ssh-copy-id learnit@192.168.80.23
/usr/bin/ssh-copy-id: INFO: Source of key(s) to be installed: "/home/Jeremy/.ssh/id_rsa_second.pub"
/usr/bin/ssh-copy-id: INFO: attempting to log in with the new key(s), to filter out any that are already installed
/usr/bin/ssh-copy-id: INFO: 1 key(s) remain to be installed -- if you are prompted now it is to install the new keys
learnit@192.168.80.23's password:
Number of key(s) added: 1
Now try logging into the machine, with: "ssh 'learnit@192.168.80.23'"
and check to make sure that only the key(s) you wanted were added.
常用参数:-i:指定密钥的绝对路径。1
$ ssh-copy-id -i ~/.ssh/id_rsa_second learnit@192.168.80.23
b. 使用一次性命令1
2$ ssh learnit@192.168.80.23 'mkdir -p .ssh && cat >> .ssh/authorized_keys' < ~/.ssh/id_rsa.pub
learnit@192.168.80.23's password:
密钥发送成功后,即可免密码登录。1
2
3$ ssh learnit@192.168.80.23
Last login: Mon Feb 6 16:06:07 2017 from 192.168.80.2
➜ /home/learnit >
客户端配置
每次输入用户名@主机地址,如果觉得比较麻烦,可以通过修改~/.ssh/config文件,简化输入。1
2
3
4
5$ cat ~/.ssh/config
Host arch
HostName 192.168.80.23
User learnit
IdentityFile /home/Jeremy/.ssh/id_rsa
登录命令可以改为:ssh arch。
使用其他用户登录可以使用命令:ssh root@arch。
客户端config参数详情,请参考man 5 ssh_config。
Github多用户使用
如果有多个Github帐户,两个帐户无法使用同一个密钥。解决方法如下。
a. 查看哪个帐户使用了key1
2$ ssh -T -ai ~/.ssh/id_rsa git@github.com
Hi higoge! You've successfully authenticated, but GitHub does not provide shell access.
b. 生成新的密钥。
c. 配置config文件1
2
3
4
5
6
7
8
9
10
11
12$ cat ~/.ssh/config
# Default github user(higoge@gmail.com)
Host github.com #任意填写
HostName github.com
User git
IdentityFile /home/learnit/.ssh/id_rsa
# second user
Host github-learnit
HostName github.com
User git
IdentityFile /home/learnit/.ssh/id_rsa_second
d. clone仓库
默认用户clone方式不变,第二个用户主机地址使用github-learnit。1
$ git clone git@github-learnit:higoge/file.git
SSH隧道
SSH隧道常用参数如下。-N:不运行远程命令,仅转发端口。-f:后台运行ssh命令。-C: 对传输的数据进行压缩。-D:连接远程服务器,监听本地端口作为本地Socks5服务,所有连接都将通过本隧道发送给远端服务器。-L:监听本地端口,对这个端口的数据操作会通过隧道发给远程服务器的对应端口。-R:监听远程端口,对这个端口的数据操作会通过隧道发给本地服务的对应端口。
a. Socks5服务1
# ssh learnit@192.168.80.23 -D 1080 -o ServerAliveInterval=60 -C -f -N
-o ServerAliveInterval=60:设置保活时间间隔,时间为60秒。
此命令可以启动本地1080端口,作为Socks5的服务端口。
b. 远程服务穿透到本地某端口。1
$ ssh -L 5902:127.0.0.1:5902 -N -f learnit@192.168.80.6
此命令的作用是加密远程桌面的连接,将远程桌面服务的5902端口穿透到本地的5902端口。
c. 本地服务穿透到外网端口1
$ ssh -f -N -R remote_ip:80:localhost:4000 root@remote_ip
此命令将本地博客框架hexo的web端口4000,映射到远端服务器的80端口,通过浏览器访问http://remote_ip即能够访问本地的4000端口。
SSH服务端配置
SSH服务端配置文件地址为/etc/ssh/sshd_config。每次修改完,请重启sshd服务。服务端config参数详情,请参考man 5 sshd_config。
限制模式
StrictModes参数表示~/.ssh文件夹的限制模式,如果设置为yes,那么~/.ssh文件夹权限为700,~/.ssh/authorized_keys文件权限必须是600。
如若密钥配置成功,但登录是还需要密码,请修改SSH文件和文件夹权限,或者将StrictModes设置为no。
登录较慢
SSH如果出现登录卡顿的情况,可以使用如下命令进行调试。1
$ ssh -vvv learnit@192.168.80.23
一般会卡在debug1: Authentications that can continue: publickey,gssapi-keyex,gssapi-with-mic,password这句话。
修改如下参数即可解决。UseDNS改为no。GSSAPIAuthentication改为no。
限制root用户登录
PermitRootLogin参数可以限制root用户的登录。
常用参数如下:yes:root用户可以登录。prohibit-password:root用户不能通过输入密码登录。without-password:root用户不能通过输入密码登录。forced-commands-only:root用户仅可以执行特定命令。no:root用户不能登录。
如果设置了forced-commands-only模式,特定命令表示设置在/root/.ssh/authorized_keys中的添加的命令。1
2# cat ~/.ssh/authorized_keys
command="ls -l" ssh-rsa AAAAB3NzaC1yc2EAAAADAQABAAABAQC+H6MNVJCpKx24FPvkX7gVE+bmjSjferbGxRZ/R3iPk9QBCZp2OrUcjhyWrjEjpV9DY1wXlDTUrg3+2HFqnhz+lEvhM0vl2Hlu3AgJsTEbWddDSZGayUTxCBg2mKe4Lks6MvVOubw3b+FmCSHtGc2mPfBtKNkr0GFWGZFXgEJKiZ9jFzx39nLaw0ZgR0WXkoRe2Nby+xyYsO2gs1u7j75CqFdKHs5zoLAV8C0d1x5tdFknuSGdMdYrbgpquSfrlQMJUIwJTzUnGLyE0a01IPs6OQ+c8LuuxDnEO8SCRDiJIh8Wyct1VWR3j3td/yq40NEyjPXqtd7bHVr8aBDjUb3t win10-cygwin
使用root用户登录后反馈如下。1
2
3
4
5
6$ ssh root@192.168.80.23
total 72
-rw-------. 1 root root 1384 Nov 29 04:31 anaconda-ks.cfg
-rw-r--r--. 1 root root 49565 Nov 29 04:31 install.log
-rw-r--r--. 1 root root 10033 Nov 29 04:28 install.log.syslog
Connection to 192.168.80.6 closed.
root用户登录成功后,直接执行authorized_keys中的command命令,反馈结果后,断开连接。
如果本文对你有所帮助,请小额赞助。
~~ EOF ~~